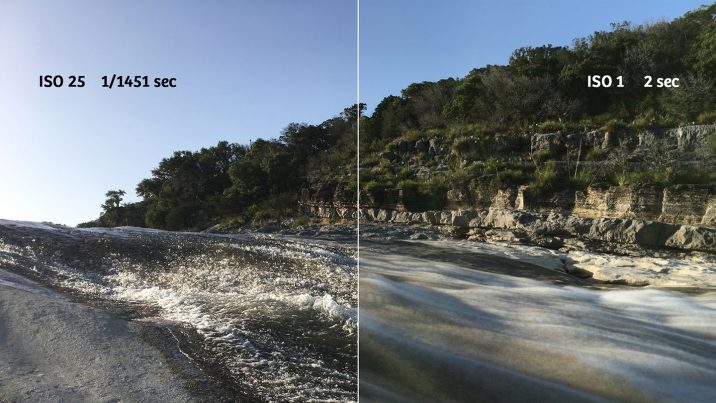
A Beginners Guide for Manual Controls in iPhone Photography: Shutter Speed
About Jack Hollingsworth
Jack Hollingsworth, a denizen of Austin, TX, is an award-winning, 30-year career veteran in commercial photography. Jack has fallen in love with his iPhone camera as his primary capture tool. He is also an avid Camera+ devotee and has been since day one. He deeply believes that, when all is said and done, the iPhone may just be remembered as the most influential capture device ever in the history of photography.
Welcome to the fourth feature in our series of Beginners Guides for Manual Controls in iPhone Photography. You can find the other installments here:
- Focus
- Exposure
- White Balance
- Shutter Speed (this post)
- ISO
Mantra for Manual: Creative Intentions
Remember in auto mode, the iPhone camera doesn’t know what your creative intentions are for any given photograph. When you shoot in auto you are, in fact, relinquishing creative control to the camera. Now, in all fairness, the iPhone, even in auto, does quite a remarkable job in determining exposure, focus, white balance, shutter-speed and ISO. And it does so, all behind-the-scenes, without you ever even knowing what is happening. But auto is not fool proof. There are many lighting conditions that will fool your in-camera iPhone meter and generate bad results. For these special circumstances and scenarios, understanding manual control will put you back in charge, and empower you to precisely execute your creative intentions. So get to know your manual controls, and you’ll be happier for it. And your photos will stand out from those who exclusively rely on auto. I’m not suggesting you always shoot in manual – heavens no. You don’t need to, because in bright light conditions the iPhone auto does a really decent job at giving you just what you’re looking for. No fuss, no muss.
I would say I shoot roughly about 80% of the time in auto. Leaving only 20% of my time shooting in full manual control for those tricky and problematic scenes – backlight, high contrasting light, predominantly white objects, predominantly black objects. Even if you primarily shoot in full or a modified auto mode, it’s important to fully understand the technology going on under the hood. That way you can seamlessly dance between auto and manual without ever missing a step.
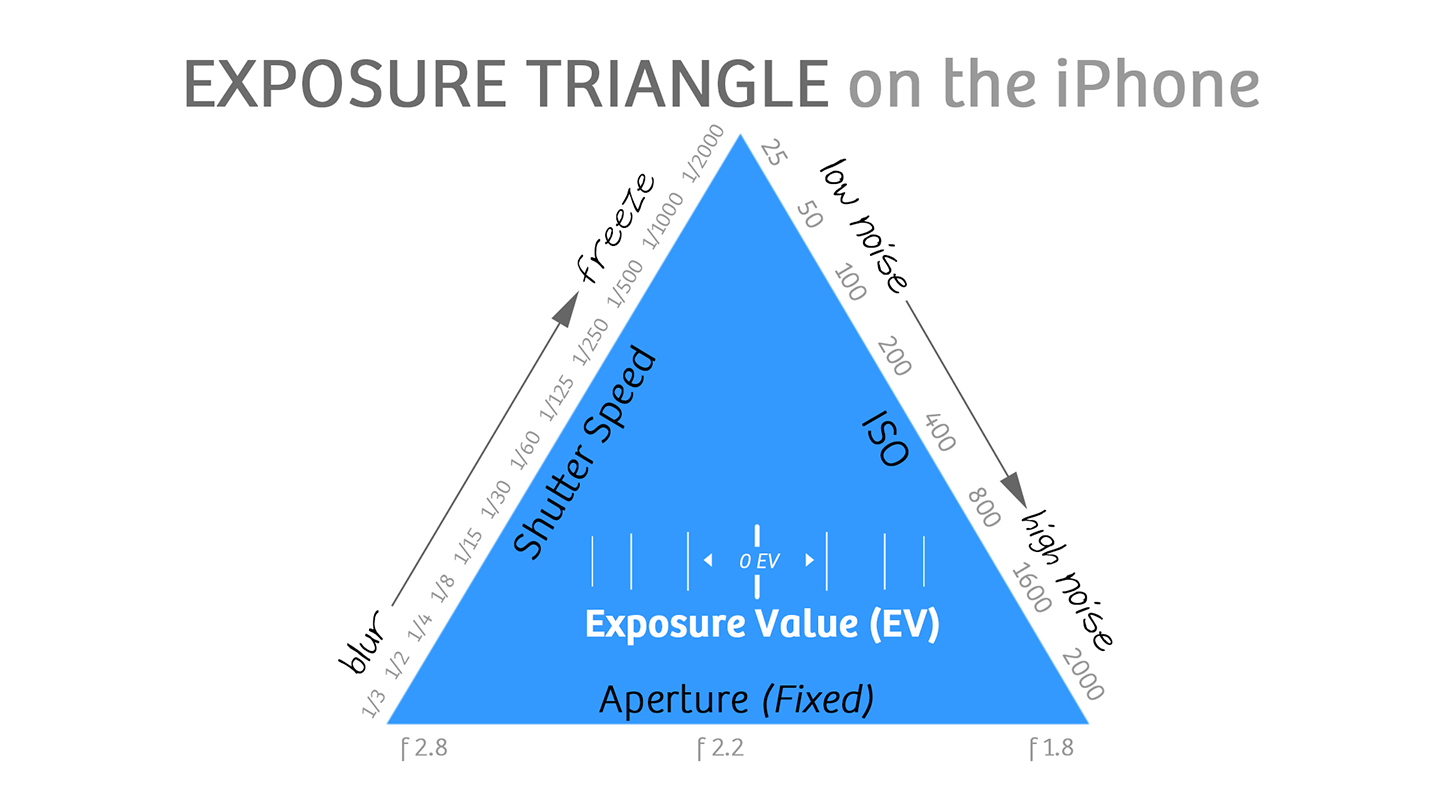
For every photograph you ever take, even smart phone photos, there are three factors that determine optimum exposure – aperture, shutter-speed and ISO.
Aperture is the intensity (or quality) of light hitting the sensor during any given exposure. On the dual-lens iPhone 7 Plus, the wide angle (28mm equivalent) has a maximum aperture of f1.8, while the component telephoto (56mm equivalent) has a maximum of f2.8.
The iPhone aperture is fixed. In other words, it stays the same regardless of what the shutter-speed or ISO is doing. Shutter speed is the duration of light hitting the sensor, and ISO sets the amount of light-sensitivity for the camera sensor. Keep an eye out for the next video in this series where we will be looking more in depth at ISO and how it practically affects your photographs!
Effects of Shutter Speed on the Final Image
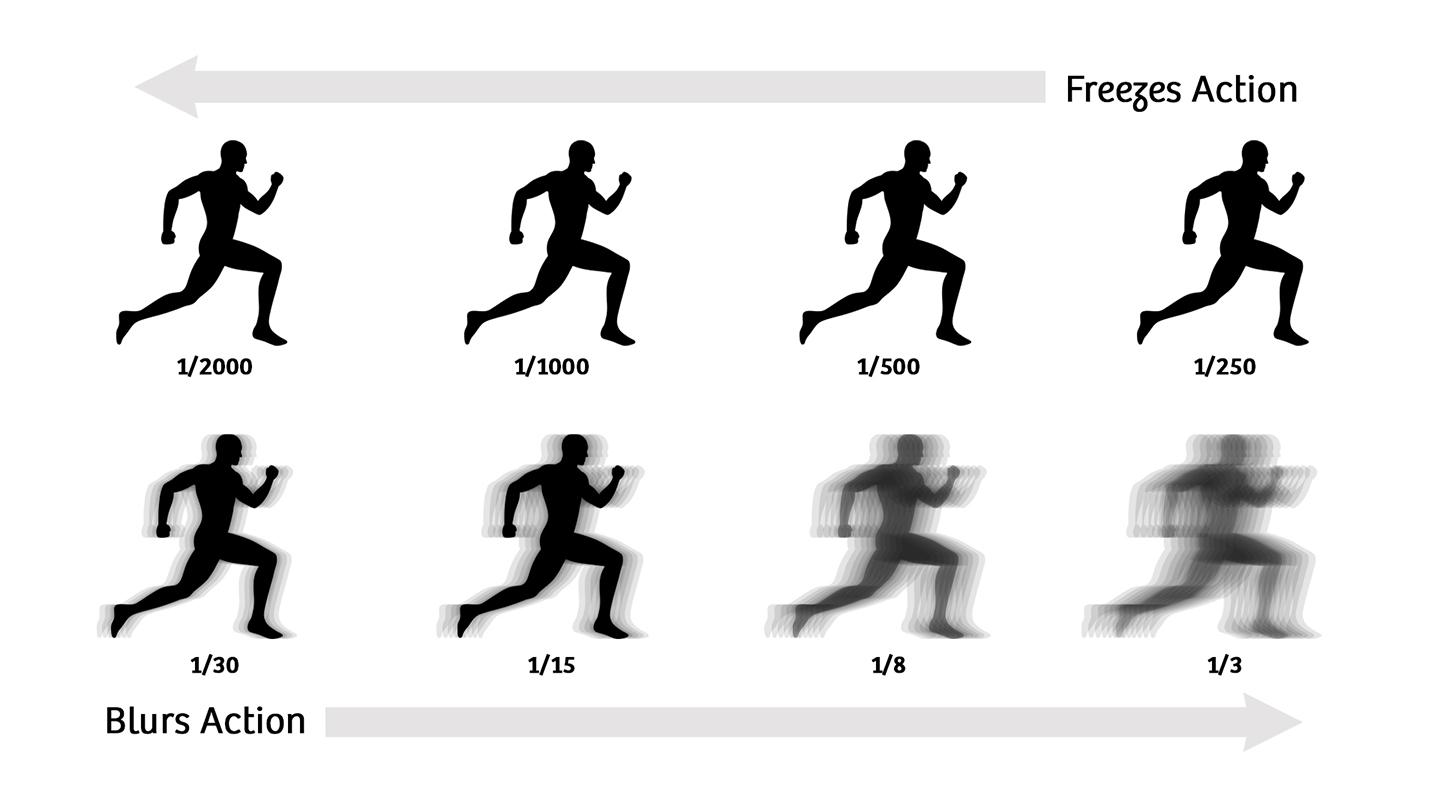
Shutter speed is measured in seconds or fractions of a second. For example, ½ second is “slower” than 1/1000 second and 1/500s is “faster” that 1/60s. Short shutter speeds are generally used to freeze action. Longer shutter speeds are used to blur action. Shutter speed values double with each setting. For example, 1/500s is letting in twice the amount of light as 1/1000s. As you go down the shutter speed scale, the amount of light being let in doubles. As you go up the scale, in each setting there is half the amount of light being let in. Once again, the iPhone camera doesn’t really know what your creative intentions are for any given photograph. So it’s important to know the effect that “fast” and “slow” shutter speeds will have on the final look of your photos. “Fast” shutter speeds (i.e. 1/2000s, 1/000s, 1/500s) will freeze your action – making people running or water flowing in a river appear tack sharp. “Slow” shutter speeds (i.e. 1/30s, 1/15s, 1/8s) will blur your action, turning those moving objects into soft blurs.
How the iPhone Handles Shutter-Speed (and ISO)
Listen carefully – this point is so important. Once I learned how the iPhone handles shutter speed and ISO, it changed everything for me. It brought a whole new sensibility to how I crafted my exposure. You see, in auto mode the iPhone camera combines both shutter speed and ISO. They are inseparable and always work in tandem. In bright light, the camera defaults to the lowest practical ISO (i.e. ISO 25-100) and the highest practical shutter speed (i.e. 1/8000s – 1/500s) for these situations. As you need more light, the ISO remains practically low and the shutter speed gets “slower”, meaning the shutter is allowing more light to the sensor. Once the shutter speed goes all the way down on the scale to where it is practical for getting a crisp photo (i.e. 1/125s – 1/30s), the ISO increases all the way to ISO 2000.

The important point I’m making here is that the iPhone camera is optimized for shooting at “fast” (high) shutter speeds. And remember, these fast shutter speeds are used for freezing motion. So if you want to shoot at a “slow” shutter speed, then you’re going to need to use a third-party app that gives total manual control over shutter speed and ISO. Enter Camera+.
This gallery of slow shutter speed photographs was all shot with Camera+ in manual mode using long-exposure settings:
Shutter Speed
Range of Shutter Speeds Available on the iPhone
This is a basic chart to help you navigate different shutter speeds. Most iPhone models have a similar shutter speed range. This chart is based on the iPhone 7 Plus, as well as including the extended shutter speed range (up to 30 seconds) when you use Camera+.
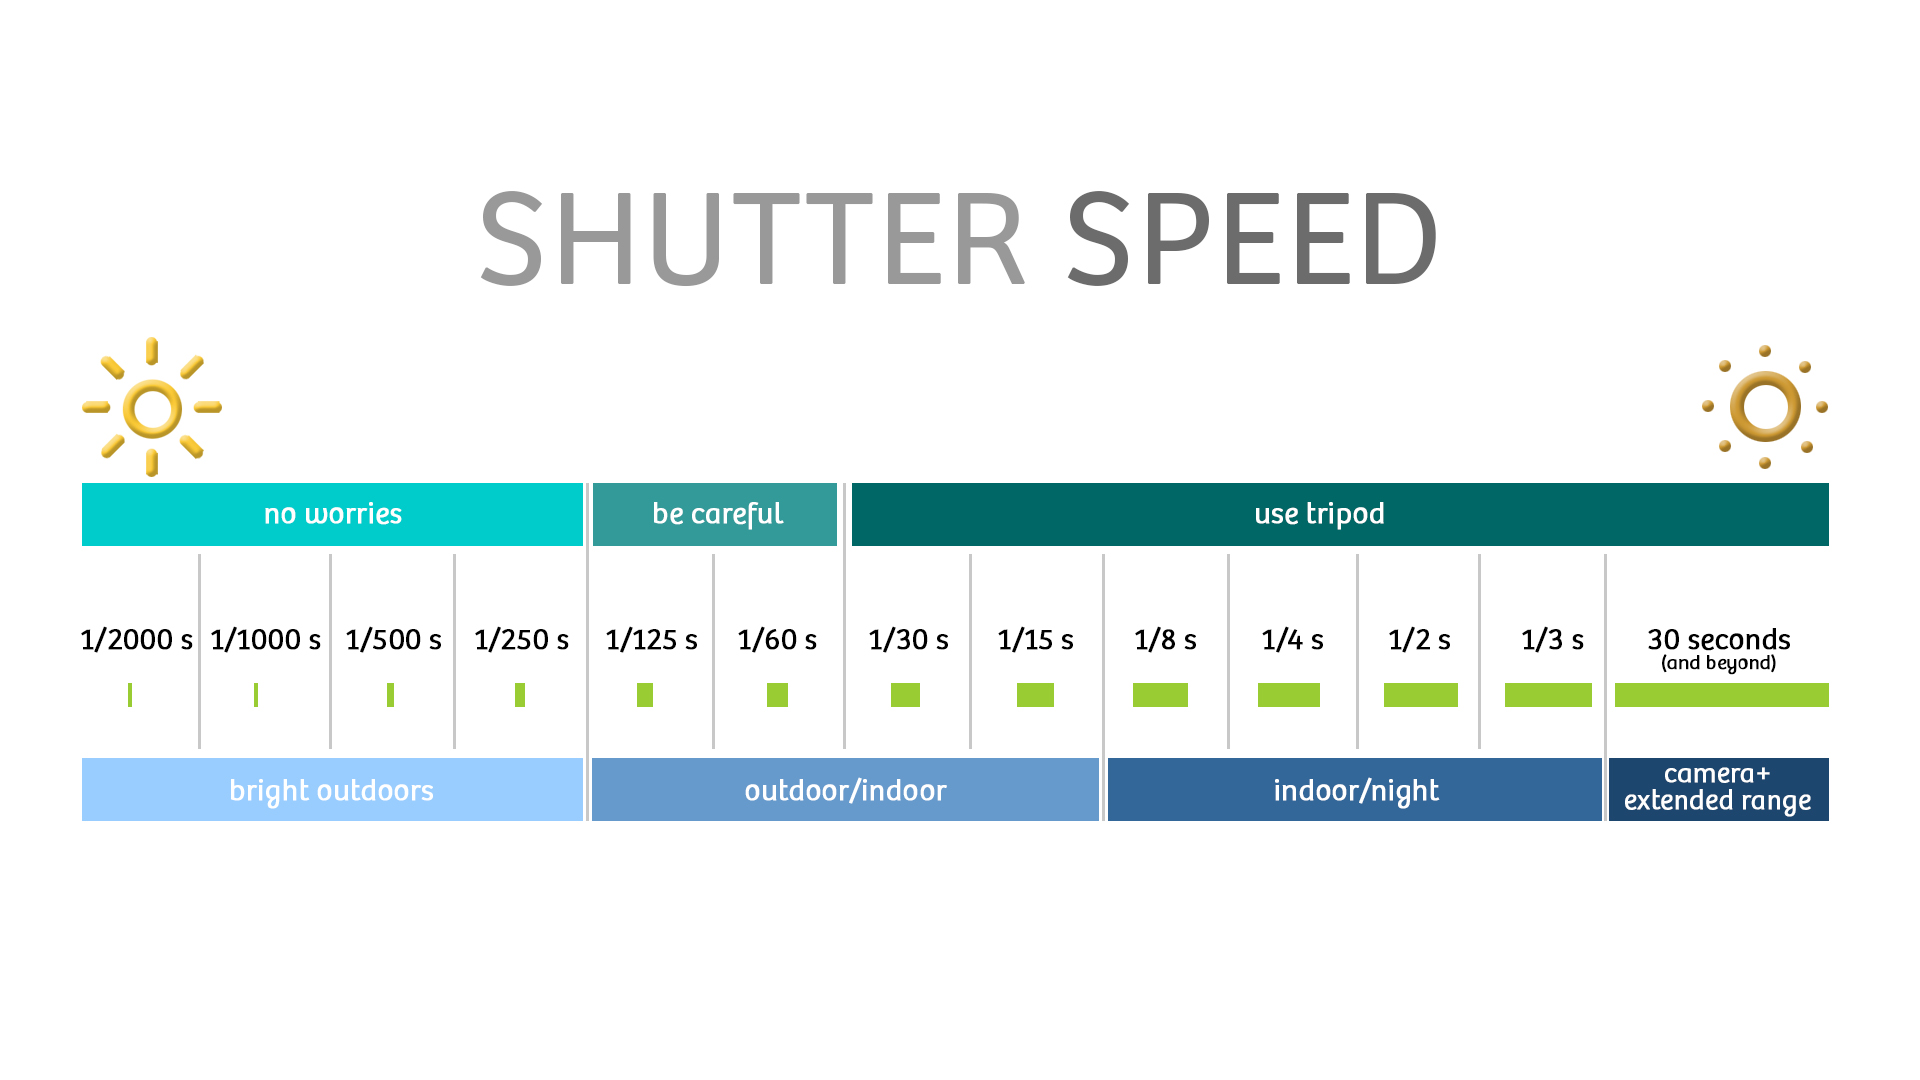
By the way, since the native app doesn’t display “live exposure data” (shutter speed and ISO) you are going to need to use a third-party camera app, like Camera+. While you are shooting it lets you see what shutter speed and ISO setting your camera is on. Being able to see this exposure metadata live is beneficial because after the photo is taken, it is of little value. This is critical in determining how sharp or blurry your iPhone photos will be. Fast or high shutter speeds (i.e. 1/500s and up) will freeze your photographs. Slow or low Shutter Speeds (i.e. 1/13s and below) will blur your photographs.
Based on my own style of shooting, I’m pretty steady up to around 1/60s. But once the shutter speed dips below 1/60s, out comes the tripod. If I am bracing myself against something, possibly holding my breath as well during exposure, then I can often hand-hold my exposures to as long as 1/15s.
Steady as She Goes
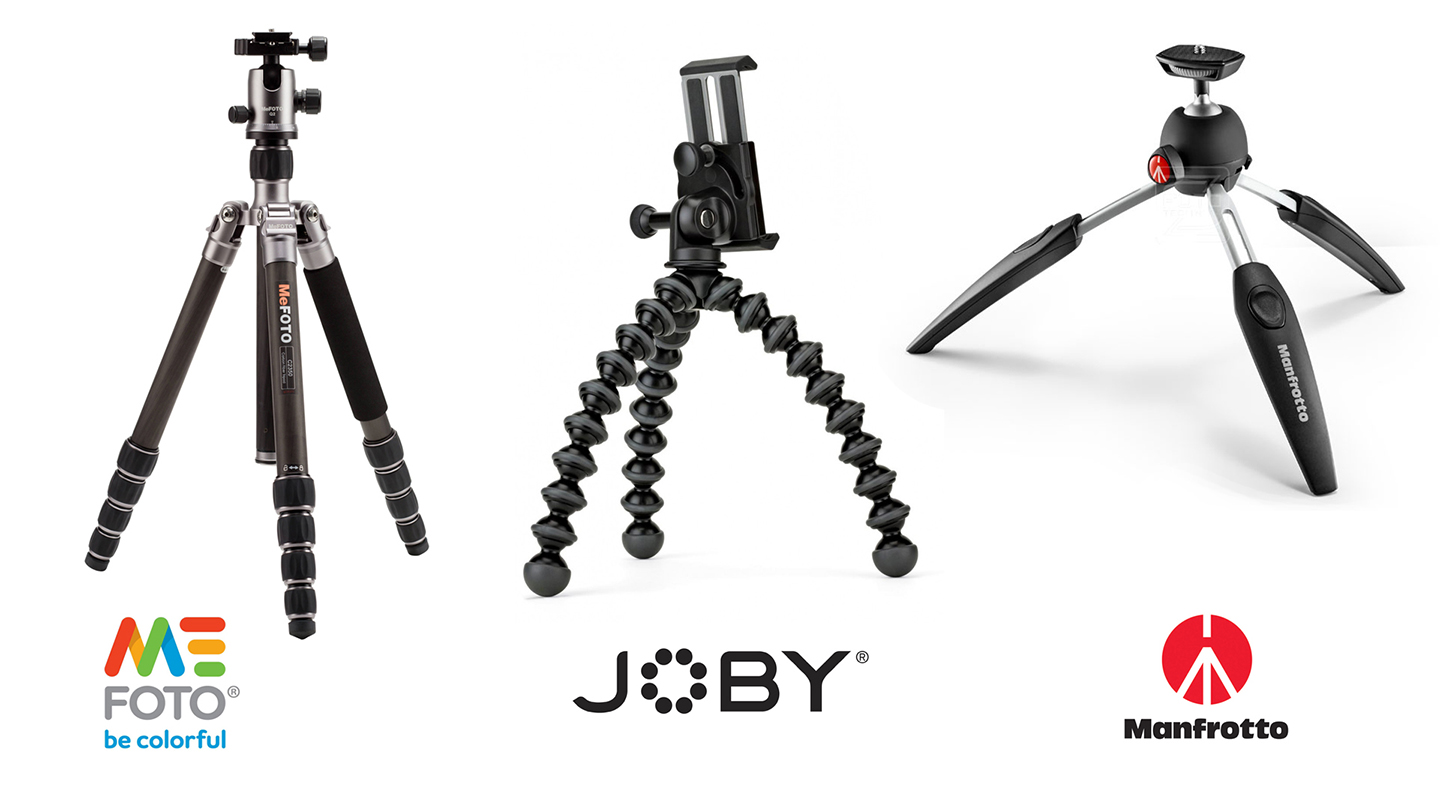
Here are three different tripods I use regularly in my own iPhone photography. Each of them has served me very well, and I don’t hesitate to recommend them to you:
Featured Posts
-
 Camera+ 10 arrives with full depth support, HEIF, accurate viewfinder and smiles!
by Pedro Cuenca
-
 A Beginners Guide for Manual Controls in iPhone Photography: ISO
by Jack Hollingsworth
-
 How To Shoot Close-Up and Macro Photography With Your iPhone
by Jack Hollingsworth
-
 A Beginner’s Guide for Manual Controls in iPhone Photography: Exposure
by Jack Hollingsworth


