A Beginners Guide for Manual Controls in iPhone Photography: ISO
About Jack Hollingsworth
Jack Hollingsworth, a denizen of Austin, TX, is an award-winning, 30-year career veteran in commercial photography. Jack has fallen in love with his iPhone camera as his primary capture tool. He is also an avid Camera+ devotee and has been since day one. He deeply believes that, when all is said and done, the iPhone may just be remembered as the most influential capture device ever in the history of photography.
Welcome to the fifth and final feature in our series of Beginners Guides for Manual Controls in iPhone Photography. You can find the other installments here:
- Focus
- Exposure
- White Balance
- Shutter Speed
- ISO (this post)
Definitions and Acronyms: ASA & ISO
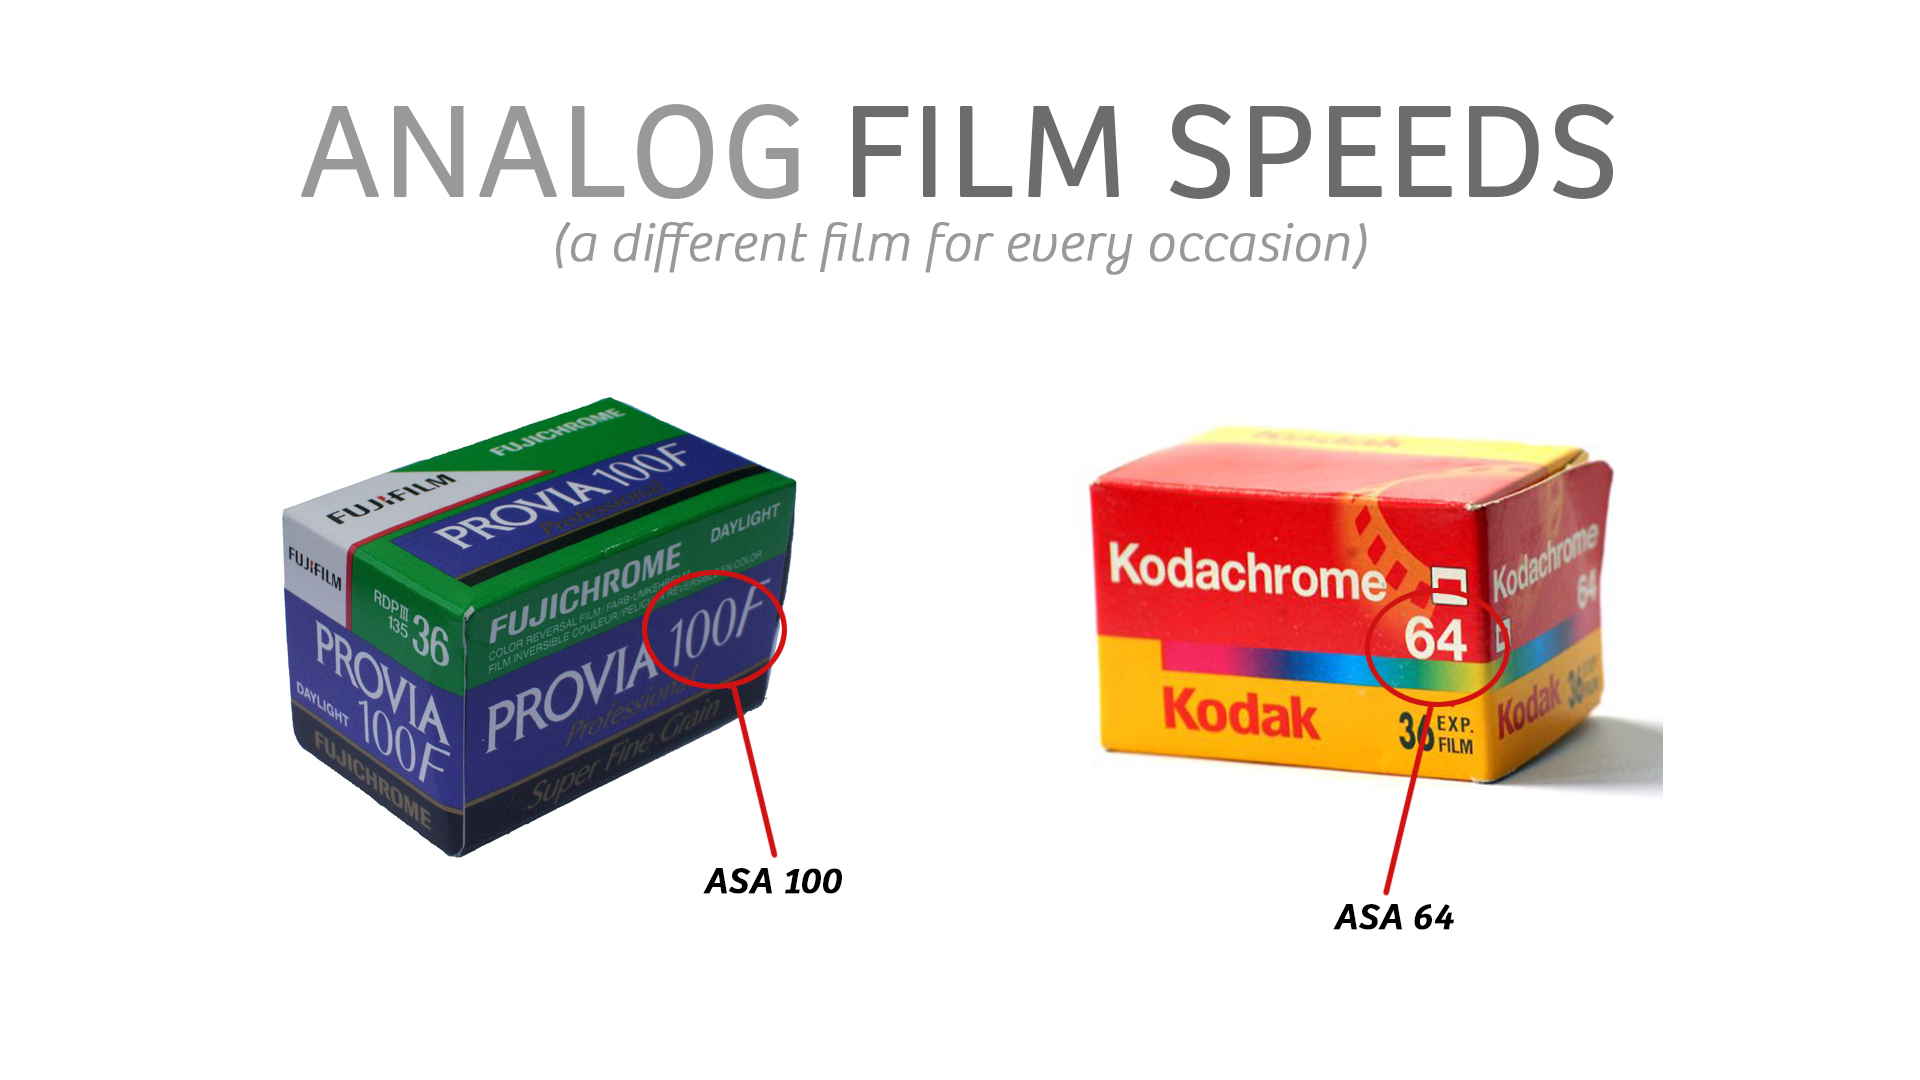
In photography-speak, for purposes of this general discussion, ASA and ISO are the same thing. ASA is a scale created by the American Standards Association that measures film speed. ASA, with few exceptions, is no longer used today. It was replaced by ISO in 1987 by the International Organization for Standardizations. (Oddly enough, it seems like it would be more justly called ISO – understandably confusing ). ASA is an old-school film acronym. ISO has more to do with the sensitivity of the sensor to light.
A Brief History Lesson
When I was learning about photography (before digital came around) if I wanted a high or low ASA (ISO) film stock, I had to go and buy it. It was time consuming and expensive. There were different “film speeds” (ASA/ISO) for every occasion. There was ‘indoor’ film, ‘outdoor’ film, ‘sport/action’ film, etc. Now in the digital day and age, instead of being burdened with having to buy various film stocks you just change the ISO dial and viola. It couldn’t be easier – or cheaper. Long live digital!
Technically Speaking
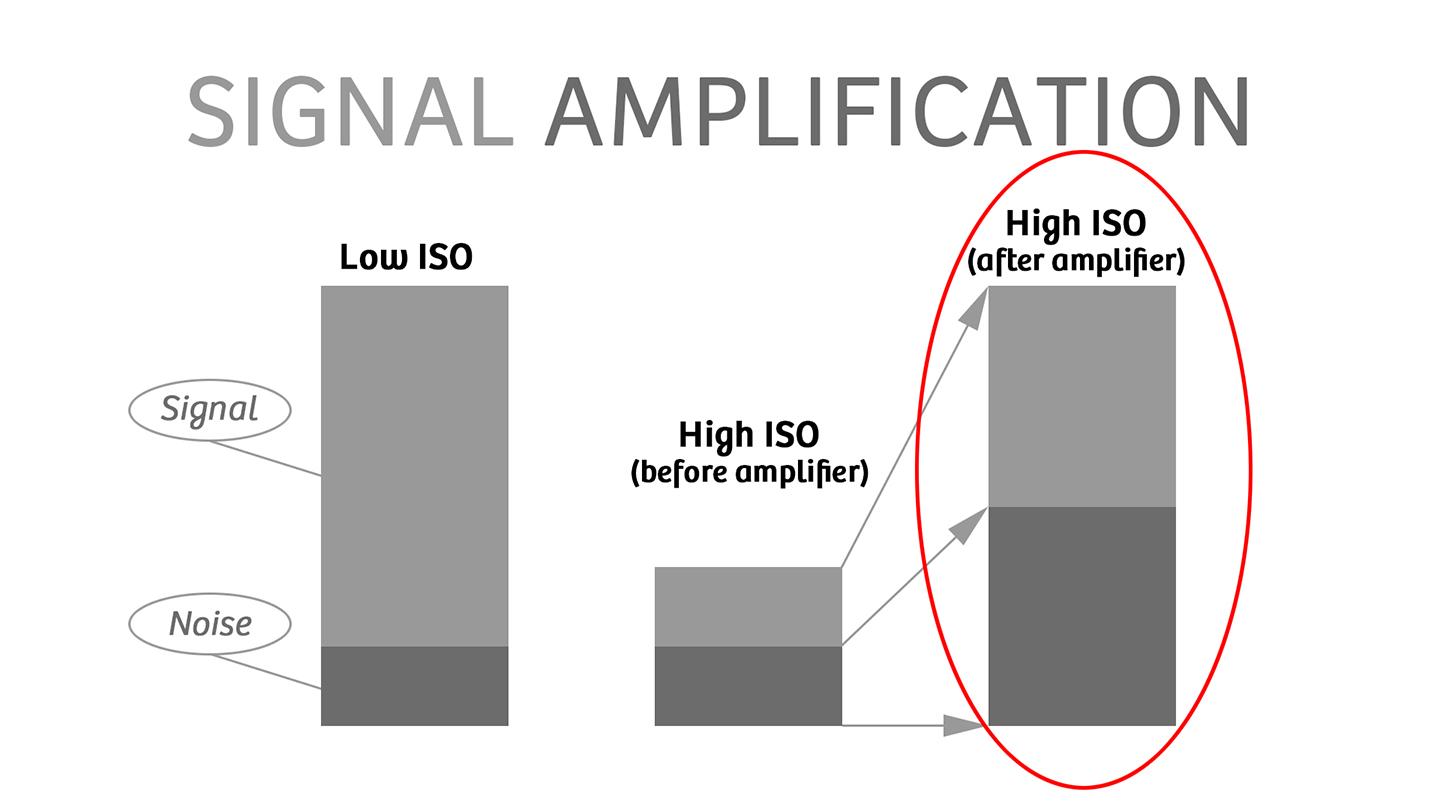
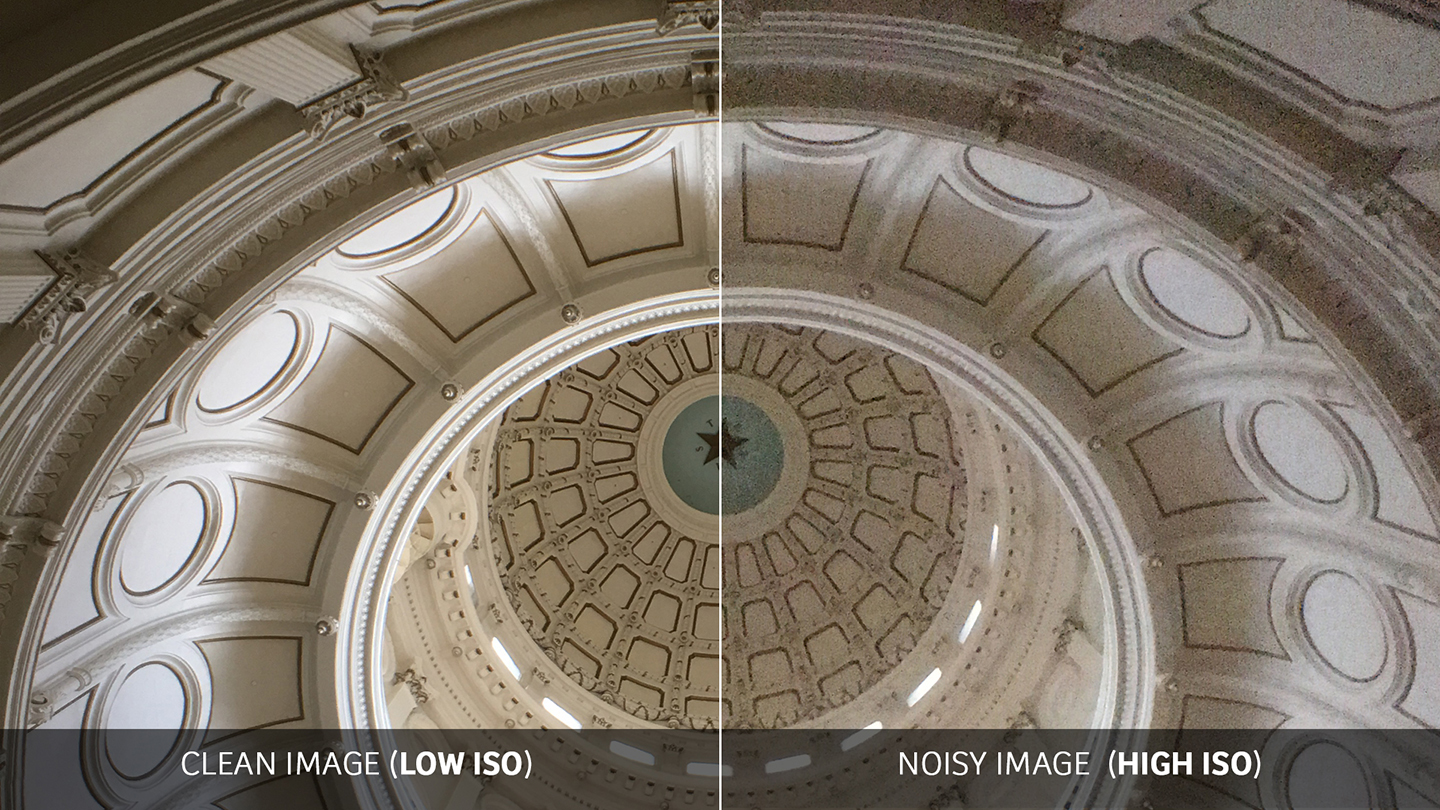
ISO sets the amount of light-sensitivity for the camera sensor. The higher the ISO, the higher the amplification factor of the sensor. The good part of amplifying light is that the photo obviously gets brighter. The bad part of amplifying light is that you’re also amplifying the noise. So the higher the ISO setting you use, the “noisier” the photo will be. Trust me, you don’t want digital noise in your photographs. It’s ugly and distracting.
Like most of photography, it’s a matter of compromises and trade-offs to get the shot that you want. Having a working knowledge of ISO will help you make wise shooting choices so you can take the best photos for any given situation.
Since the aperture on the iPhone camera is fixed, you really only have two variables to work with in controlling exposure – shutter speed and ISO. When freezing or blurring of the subject is most important, then I make sure I get the optimum shutter speed. And when having a low-noise photograph is my top creative priority, I then focus on controlling the ISO.
The iPhone is Optimized for Low ISO Shooting
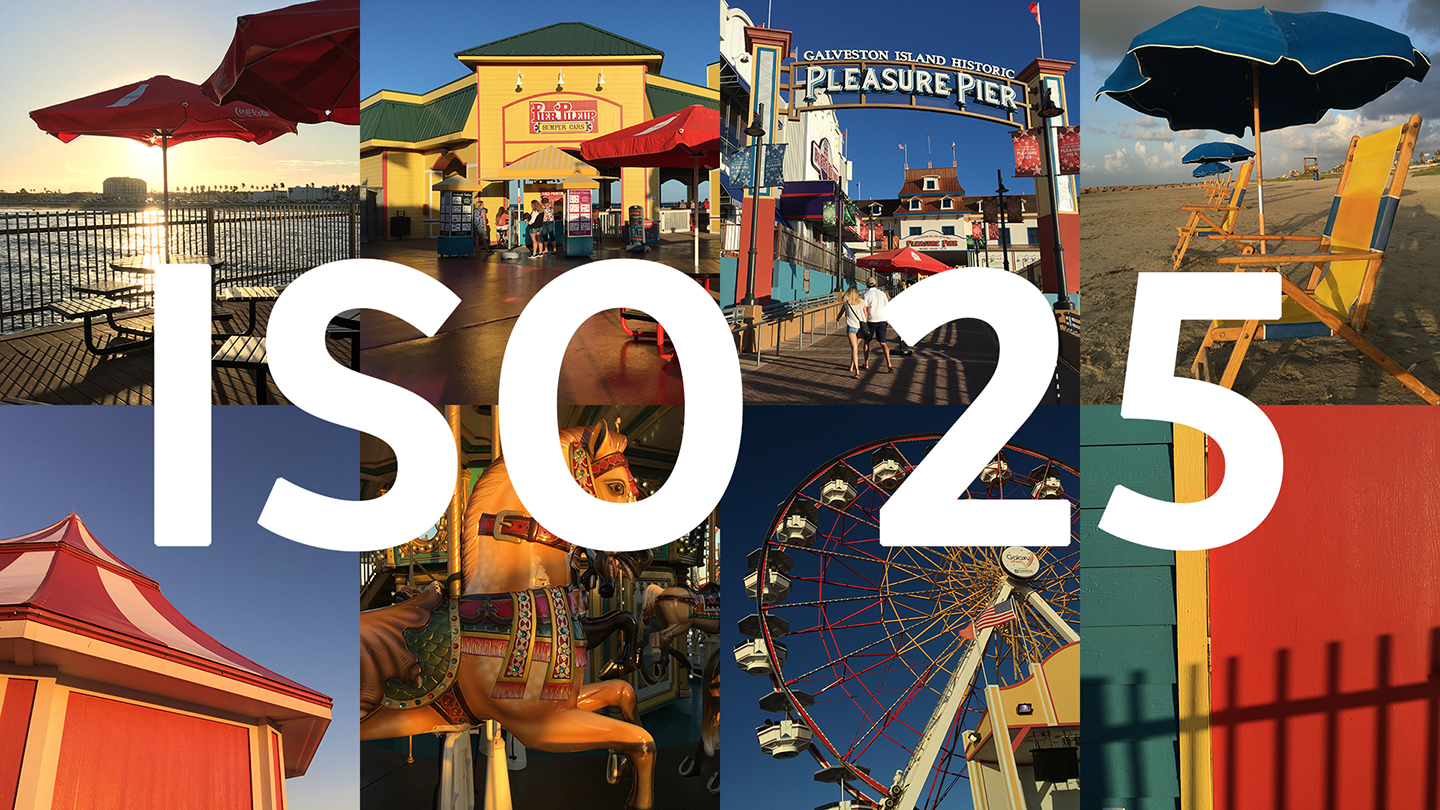
I want you to go outside in full, bright, sunlight and snap off a dozen photographs. Then come inside and look at the EXIF data. What you’re going to find is that most of the images will indicate being shot at a low ISO – somewhere in the neighborhood of ISO 25 to ISO 50. Why? Simple – because low ISO photos create low noise photos. So our friends at Apple have optimized the iPhone camera to shoot at a low ISO setting in bright light.
A few weeks back I was down in Galveston, Texas shooting Pleasure Pier. I randomly pulled these eight photographs shot over a two-hour window, and every single one of them indicated that it had been shot at ISO 25. Again, the iPhone is optimized for low-ISO shooting. That is the way Apple built it.
What to Do When the Light is Not Bright?
Because your iPhone sensor needs more light to get an exposure, the ISO, by default, will continue to remain low while the shutter speed gets slower (i.e. ISO 25/1000s, ISO 25/500s, ISO 25/250s, ISO 25/125s, etc.). Once the shutter speed goes all the way down to what is ideal for getting a crisp photograph (i.e. 1/60s, 1/30s, 1/15s), the ISO begins to increase. It can potentially go all the way up to the maximum of ISO 2000. As the ISO increases, so does the amplification signal as does the resulting “noise” (an important distinction to make here is that “noise” is not the same as “grain” – see the tips below for further explanation). Low ISOs create low-noise photographs and high ISOs create high-noise photographs.

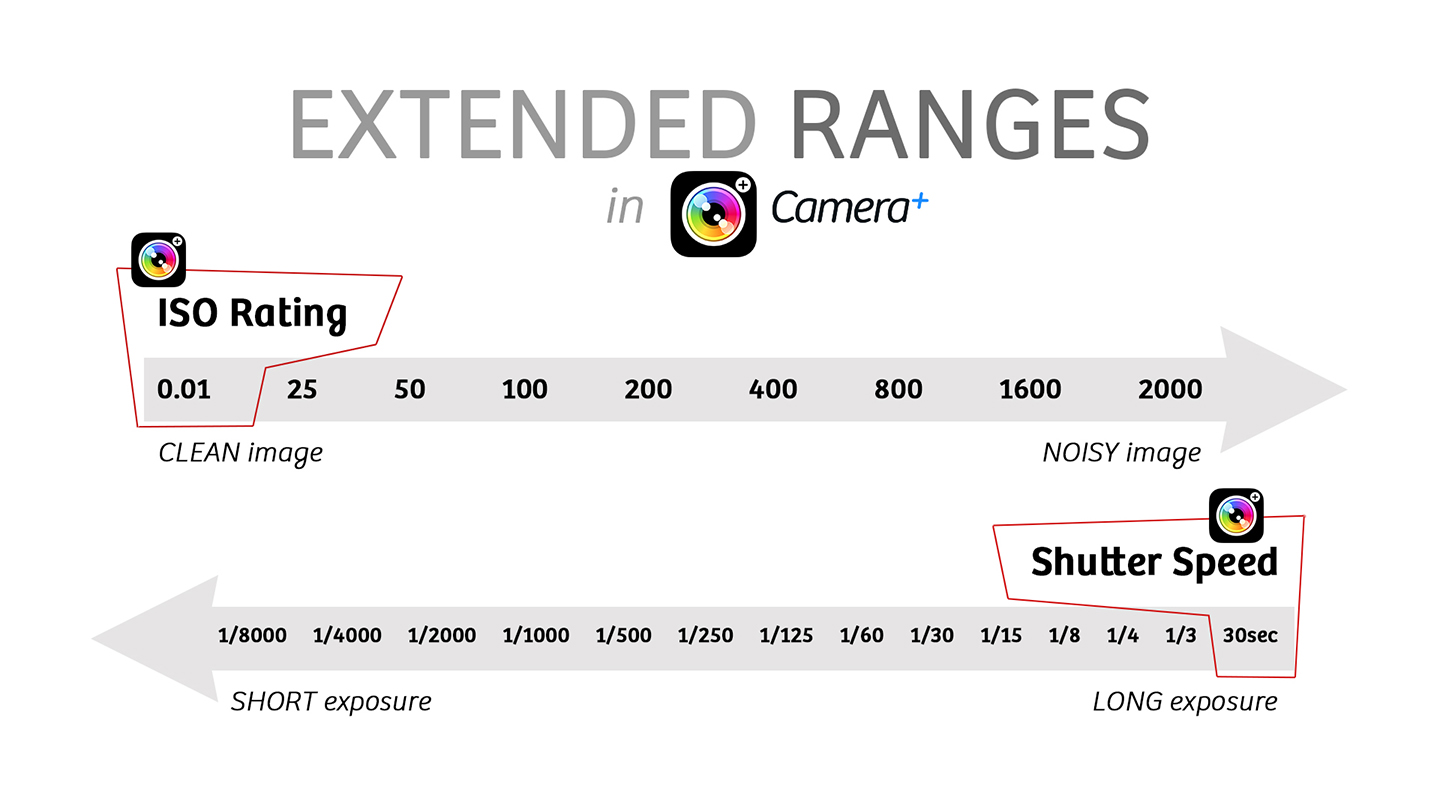
Extended ISO and Shutter Speed Ranges
One of the benefits of using Camera+ is that it has extended ISO and shutter speed ranges that go beyond what the standard Camera app is capable of. To understand what these extended ranges give you, you need to first understand what the default app gives you.
ISO Rating
- On the iPhone, ISO range is approximately ISO 25 to ISO 2000
- Camera+ gives you an extended ISO range to ISO 0.1
Shutter Speed
- iPhone shutter speed range is 1/8000s (fast) to 1/3s (slow)
- Camera+ gives you an extended shutter speed range up to a full 30 seconds
General Tips on Manual-Controlled Photography with Your iPhone
Manage Your Expectations
As much as I love my iPhone, it simply does not have a full-frame sensor. It’s getting better all the time, but don’t expect it to be a DSLR…just yet. Which means you need to learn to work within the 8-stop dynamic range of an iPhone sensor (half of the range of most DSLRs). Do not let this discourage you. By making sure that the dynamic range of the scene (8 stops) does not exceed the dynamic range of the sensor (8 stops) and blowing out highlights or losing shadow detail, you can create photos that will trick people into thinking you own a fancy DSLR.
Low-Light/Low-ISO
One of the cool experiences I have had shooting with Camera+ in full manual mode is finally being able to get low-ISO photos in low light. (Hint: you need a steady tripod.) As we discussed, by default the native camera defaults in bright light conditions to a low ISO and high shutter speed, and the exception is when you are shooting indoors under low-light conditions. In these instances, the native camera defaults to a high ISO (meaning high noise) But now, with Camera+, because you have control over your shutter speed, you can create low-noise photographs, even indoors under very low-light conditions.
Noise in the Shadows
ISO “noise” is most apparent in the shadowy darker areas of the photograph, so be careful. Digital noise in the highlight areas is quite forgiving.
Grain vs. Noise
“Grain” is not the same as “noise”. “Grain” is a false throwback from analog, and generally is a positive in its adding to the emotional, nostalgic or cinematic feel of the photograph. “Noise”, on the other hand, is annoying and unattractive. It is clumps of colored speckles that look terrible.
Small Sensors – More Noise
Small sensors, like on the iPhone, are prone to produce much more noise at higher ISOs than larger sensors, so pay attention.
80/20 Rule
I shoot approximately 80% of the time in auto mode and 20% in manual, for the trickier shots with irregular lighting. I’ve found this to be a good balance.
Last Resort
Remember the exposure triangle – the three factors that control exposure – are aperture, shutter speed and ISO. The aperture on the iPhone is fixed – nothing you can do about it. That leaves both the ISO and the shutter speed to control. It is preferable to play with the shutter speed and then change the ISO as a last resort.
Web vs. Print
If you are primarily posting your photos to social media the “noise” won’t play as significant a part when you go to print your images. Social media is forgiving to noise-laden photos. Print is not!
Live Exposure Display
It is always preferable to see what shutter speed and ISO the camera is on. That’s exactly why I shoot with Camera+. It has a “live exposure display” feature so there is no guesswork.
Optimized for Under 100 ISO
To get the best photos that you can, the iPhone camera is optimized for best results between ISO 25 and ISO 100.
Happy shooting!
Featured Posts
-
 Camera+ 10 arrives with full depth support, HEIF, accurate viewfinder and smiles!
by Pedro Cuenca
Camera+ 10 arrives with full depth support, HEIF, accurate viewfinder and smiles!
by Pedro Cuenca
-
 A Beginners Guide for Manual Controls in iPhone Photography: Shutter Speed
by Jack Hollingsworth
A Beginners Guide for Manual Controls in iPhone Photography: Shutter Speed
by Jack Hollingsworth
-
 How To Shoot Close-Up and Macro Photography With Your iPhone
by Jack Hollingsworth
How To Shoot Close-Up and Macro Photography With Your iPhone
by Jack Hollingsworth
-
 A Beginner’s Guide for Manual Controls in iPhone Photography: Exposure
by Jack Hollingsworth
A Beginner’s Guide for Manual Controls in iPhone Photography: Exposure
by Jack Hollingsworth