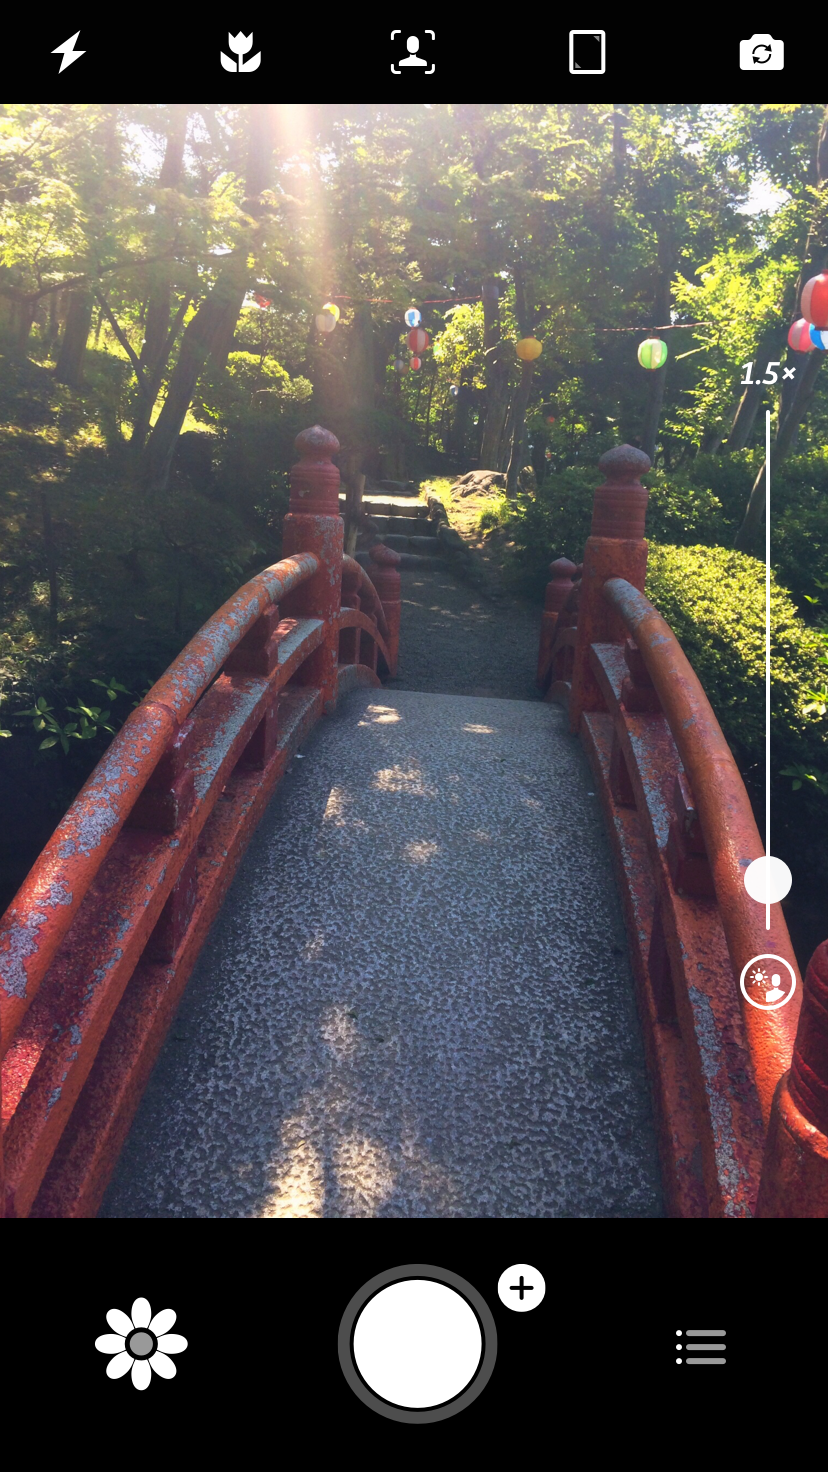
Camera+ Basics: The Shooting Screen
Welcome to Camera+ Basics! I’m here to help you learn about how to use Camera+. Whether you’re a new or veteran user I hope you can learn a few tips and tricks. If you have further questions, please don’t hesitate to contact , and I’ll add to and revise this as new questions are asked so that it’s the most up to date and comprehensive guide.
The Shooting Screen
Since the shooting screen is pretty much the first thing you see when you launch Camera+, I thought it would be a great place to start!
Focus and Exposure
When it’s launched, Camera+ defaults to autofocus, but even though it’s invisible, you can change how the focus and exposure work by just tapping the screen. This brings up the touch focus box, and you can change where the focus is in your photo by dragging it around the screen. If you tap with 2 fingers (or tap the “+” in the top right of the box) you can bring up the exposure control separately. Now you can focus on one part of the image by dragging the focus box, and expose based on a different part by dragging the exposure circle. If you accidentally bring up the exposure circle, you can get rid of it by dragging it back onto the focus box, or double tap on the screen to reset your controls and return to auto focus mode.
Here’s the rundown of what everything else on the shooting screen does:
 1234567891011
1Flash
Tap this button to select whether or not you want the flash to fire. There are icons which represent the following options: always on, always off, automatic, and flashlight mode. In flashlight mode, the light on your phone remains on constantly, which may drain your battery if used for long periods.
2Macro
This button toggles macro mode on and off. Macro mode is used for taking extreme close ups of your subject.
3Portrait
This button toggles portrait mode on and off, and only appears if your device is capable of using it. Portrait mode focuses in on your subject, and emphasizes it with a slight blur to the background. When portrait mode is on, extra depth information about your photo is saved and special editing tools are available to adjust and enhance the effect
4Aspect Ratio
Tapping this button toggles between 3 available aspect ratios for your photos. The options are normal, square, and 16:9 (cinematic).
5Camera Side Selection
This button toggles between the back (normal) and front (selfie) camera.
6Zoom
The zoom bar allows you to adjust how far in or out your photo is zoomed. This bar may be turned off.
7Back Camera Selection
This control is only present on phones that have a dual camera on the back (normal camera). This allows you to toggle between wide angle, telephoto, and dual camera (automatic) modes.
8Menu
Tapping this brings up the menu, where you can really customize how Camera+ works. This topic deserves it’s own post so I’ll leave it at that for now.
9Shooting Modes
Tapping this button will give you a number of options to adjust your shooting mode. Along the top are toggles to activate or deactivate the following
- Grid overaly
- Horizon level
- Saving location data
- Saving RAW versions of each photo
The bottom row is a dial that changes how the shooting screen works. Here are the available modes:
- Timer: Tap the time in the center of the screen to change between preset amounts of time. Tap the shutter to begin countdown.
- Stabilizer: The phone will detect when you are no longer moving, and take the photo at the first opportunity after the shutter is pressed.
- Normal: If you accidentally get stuck in any other mode, change to this one to go back to normal!
- Burst: Hold the shutter to take many photos in rapid succession.
- Smile: Tap the shutter, and the phone will wait until everyone smiles to take your photo.
10Shutter Button
Tap this to take a photo. Easy!
11Lightbox
The Lightbox is another topic that deserves an entire post devoted to it. But briefly,by default photos you take are stored in the Camera+ Lightbox, where you can select and edit your best shots, weed out the bad ones, and only send what you want to your camera roll. Tapping this button will take you there, but force tapping it will show you the last photo taken and give you a few options. That way you can see how your shot came out as quickly as possible.
If you still have questions about the shooting screen, please contact support and ask away. You may even see the answer here in the future!
Featured Posts
-
 Camera+ 10 arrives with full depth support, HEIF, accurate viewfinder and smiles!
by Pedro Cuenca
-
 A Beginners Guide for Manual Controls in iPhone Photography: ISO
by Jack Hollingsworth
-
 A Beginners Guide for Manual Controls in iPhone Photography: Shutter Speed
by Jack Hollingsworth
-
 How To Shoot Close-Up and Macro Photography With Your iPhone
by Jack Hollingsworth
