A Beginner’s Guide for Manual Controls in iPhone Photography: Focus

About Jack Hollingsworth
Jack Hollingsworth, a denizen of Austin, TX, is an award-winning, 30-year career veteran in commercial photography. Jack has fallen in love with his iPhone camera as his primary capture tool. He is also an avid Camera+ devotee and has been since day one. He deeply believes that, when all is said and done, the iPhone may just be remembered as the most influential capture device ever in the history of photography.
Welcome to the first feature in our series of Beginners Guides for Manual Controls in iPhone Photography. You can find the other installments here:
- Focus (this post)
- Exposure
- White Balance
- Shutter Speed
- ISO
Don’t Take Focus For Granted
Besides Exposure, Focus is probably the second most important part of the iPhone photography experience. Viewers will tolerate almost any technical difficulty with your photography, except focus. If your picture is not in focus, then all the rest of your technical and creative efforts are for naught. Also, there is relatively precious little you can do to salvage an ‘out of focus’ photograph. Get your exposure and focus taken care of first, then the rest of the creative process will be more enjoyable.
1.0 don’t take focus for granted


Technology and Art
I feel compelled to say this – most experienced photographers know quite well that the technical and mechanical aspects of photography need to become almost reflexive or ‘second nature’ before the creative part of the equation kicks in. Creating focused photographs is a tech skill and one you need to learn right at the onset.

Degrees of Sharpness
Focus and Sharpness are somewhat relative terms and concepts. There are degrees of each. It all depends on the clarity of detail you want in your finished photograph. Some photographers will insist on nothing short of ‘tack sharpness’. Others will be somewhat forgiving with their focus points. Still others will prefer a more ‘artful’ approach and have intentional ‘out of focus’ elements in the frame. You, the photographer, will be the ultimate judge of focus and sharpness.

Autofocus Points in Smart Phone Cameras
Let’s briefly talk about the iPhone camera’s handling of autofocus. All mobile camera devices have built-in autofocus (AF) systems, the majority of which are powerfully accurate and dependable (as is the iPhone camera). All these systems rely on one or more ‘focus points’ to properly set focus. The precise number of ‘focus points’ depends on the device you’re using (Apple doesn’t disclose this information for their iSight cameras). Generally speaking, most mobile AF systems are set up to maintain optimum focus in the center of the frame and less around the edges:

Pixel Peeping
The retina display, as awesome as it is, can sometimes be a little deceiving when it comes to properly evaluating focus. If I’m unsure whether my photo is properly focused or not, I will try a technique called ‘pixel peeping’. This is a simple matter of opening the photo up in the camera roll and either ‘double tapping’ or ‘pinch zooming’ to look at the shot at a higher magnification. If the images look ‘focused’ at higher magnification, then move on. If not…try again. Yes, this does significantly slow down the creative shooting process, but it’s worth it for those special shots you want full focus detail in the final image.
How Focus Works
The iPhone camera, or any camera for that matter, can only focus on a single point at a time, but there is an area that stretches in front of and behind that single focus point called the ‘zone of sharpness’ or more commonly referred to as ‘depth of field’ (DOF). This DOF is described as either ‘shallow’ (not much) or ‘deep’ (a lot).
What’s important here, when shooting with your iPhone camera, is to make sure you draw the viewers attention to that primary focus point in the photograph, then use DOF techniques to either accentuate or minimize the overall ‘zone of sharpness’.

Four Factors That Affect Depth Of Field
Truth is, getting the camera to focus properly on a single focus point is relatively simple. My suggestion would be to primarily use your ‘tap focus’ reticle and specifically tap on an area of the frame that you want to be the central point of focus in your photograph.
The more challenging and fun part is learning to control ‘depth of field’. Generally speaking, with almost all cameras, you control your DOF via:

The iPhone 6 and 6 Plus cameras have a fixed lens aperture of f2.2 and a fixed focal length of lens at 4.15mm (approximately a 30mm lens) so for shooting with your iPhone camera, the first two will be ‘non-factors’. Let’s concentrate on the second two:
Light Levels
When I talk about ‘light levels’ in photography, I’m talking about how much light you have to capture an image. If you are shooting indoors at night, the chances are pretty good that your light level is low. If you are shooting outdoors, on a bright day with full sunshine, your light level is high. The iPhone camera, in bright light, has ‘deep focus’ (where everything is in focus). In order to get to get ‘shallow focus’ (where subject is in focus and background is out of focus) it is better to shoot in low light.
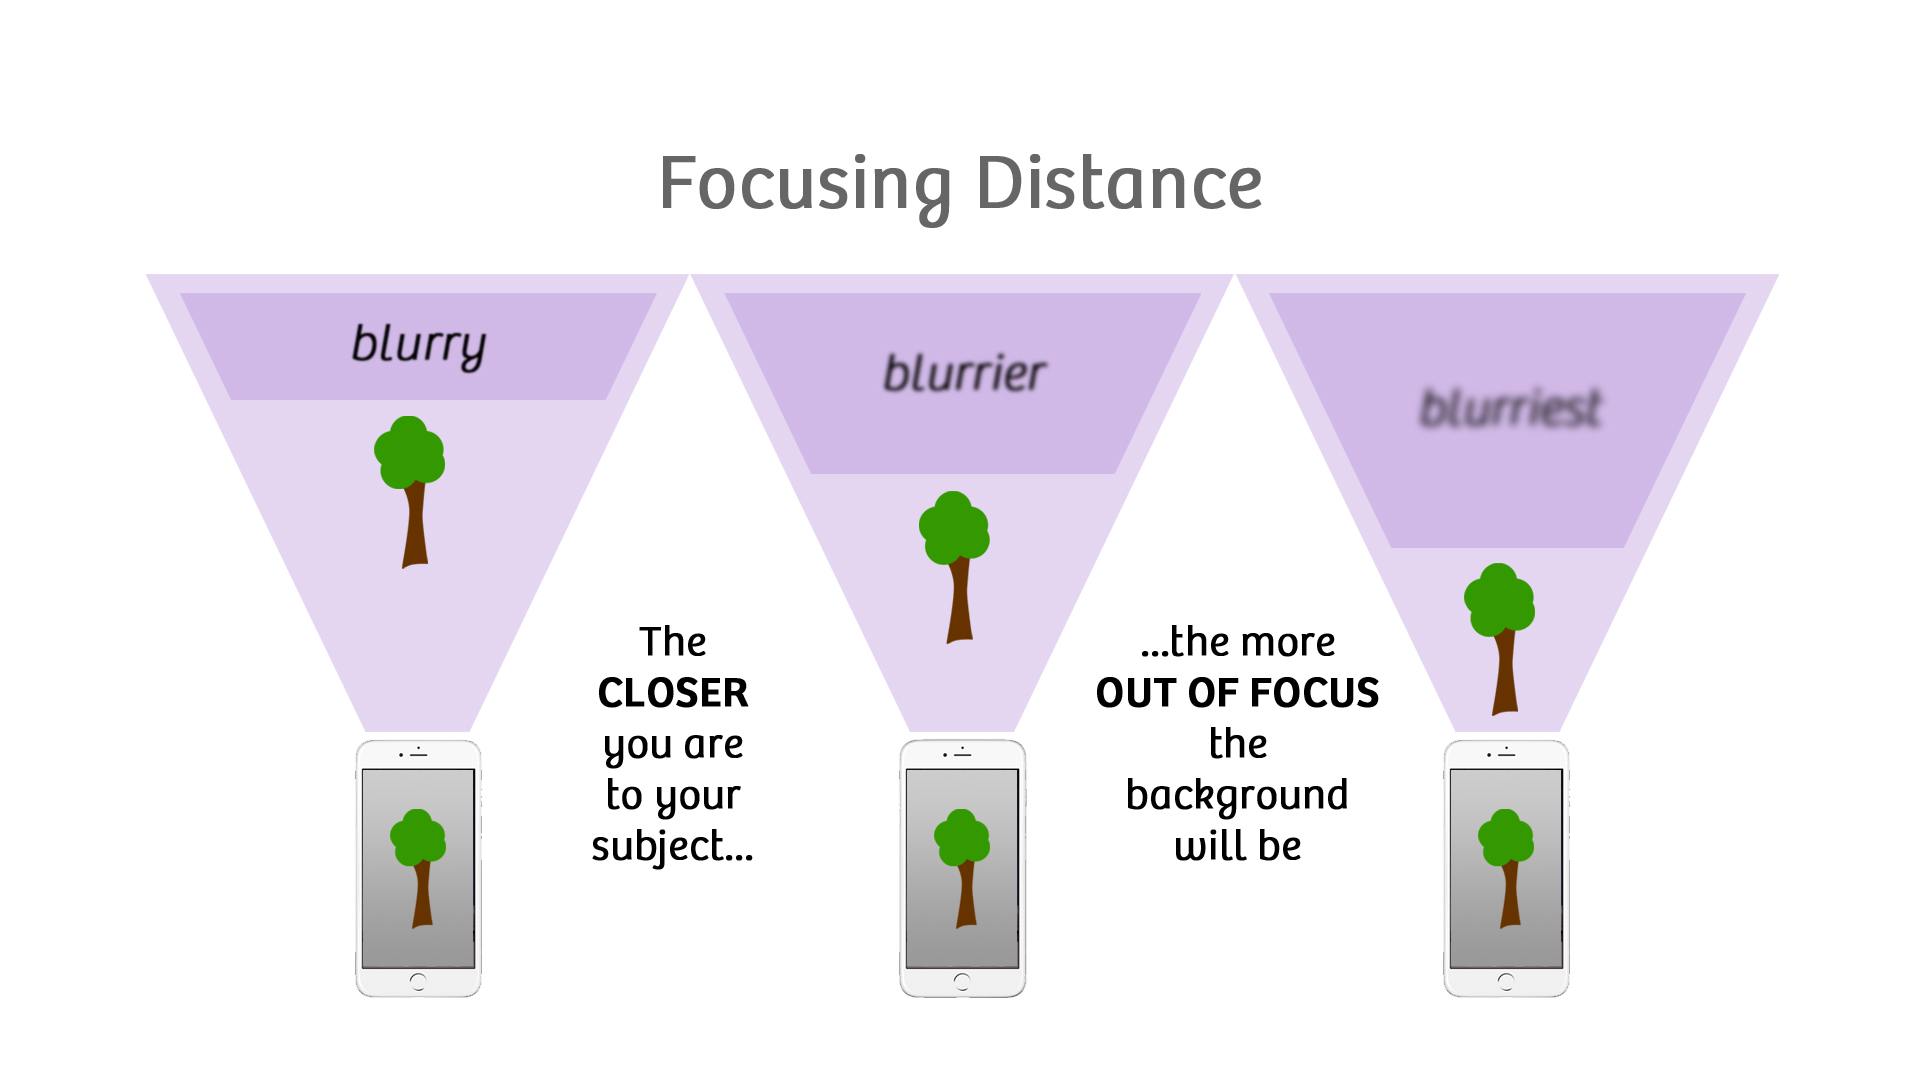
Focusing Distance
In iPhone photography, the real ‘secret sauce’ to getting your main subject sharp and the background out of focus is understating ‘focusing distance’ – which is the distance from the lens to the subject. The closer your camera lens gets to the object you’re shooting, the more ‘out of focus’ (or softer) your background will become, especially if you are shooting in low light.
The iPhone 6 and 6 Plus Lens
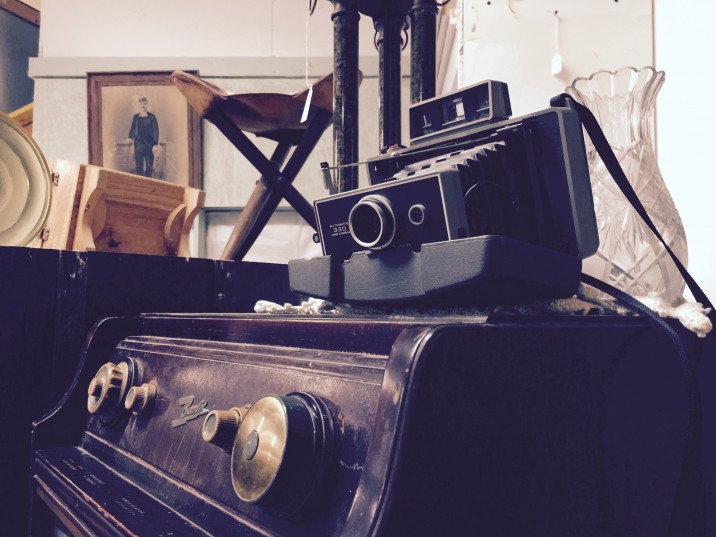
The iPhone lens is small in size but mighty in performance. The more I shoot with the iPhone camera, the more I’m impressed with what this tiny lens is able to deliver in terms of picture quality. Amazing! For you ‘techies’ that are taking notes, here is a nice snapshot of the iPhone lens:

3 Ways to Focus Your iPhone Camera
There are 3 simple ways to focus your iPhone camera:


Focal Length and Field Of View
When talking about manual focus, it’s hard not to also talk about:
- Focal Length
- Field (Angle) Of View
The Focal Length is the distance, measured in millimeters, from the optical center of the lens to the sensor. The Field of View (or angle of view) is what that lens sees in ‘degrees’. The iSight camera in the iPhone 6 has a focal length of 4.15mm (or a 30mm equivalent) and a 73˚ field of view.
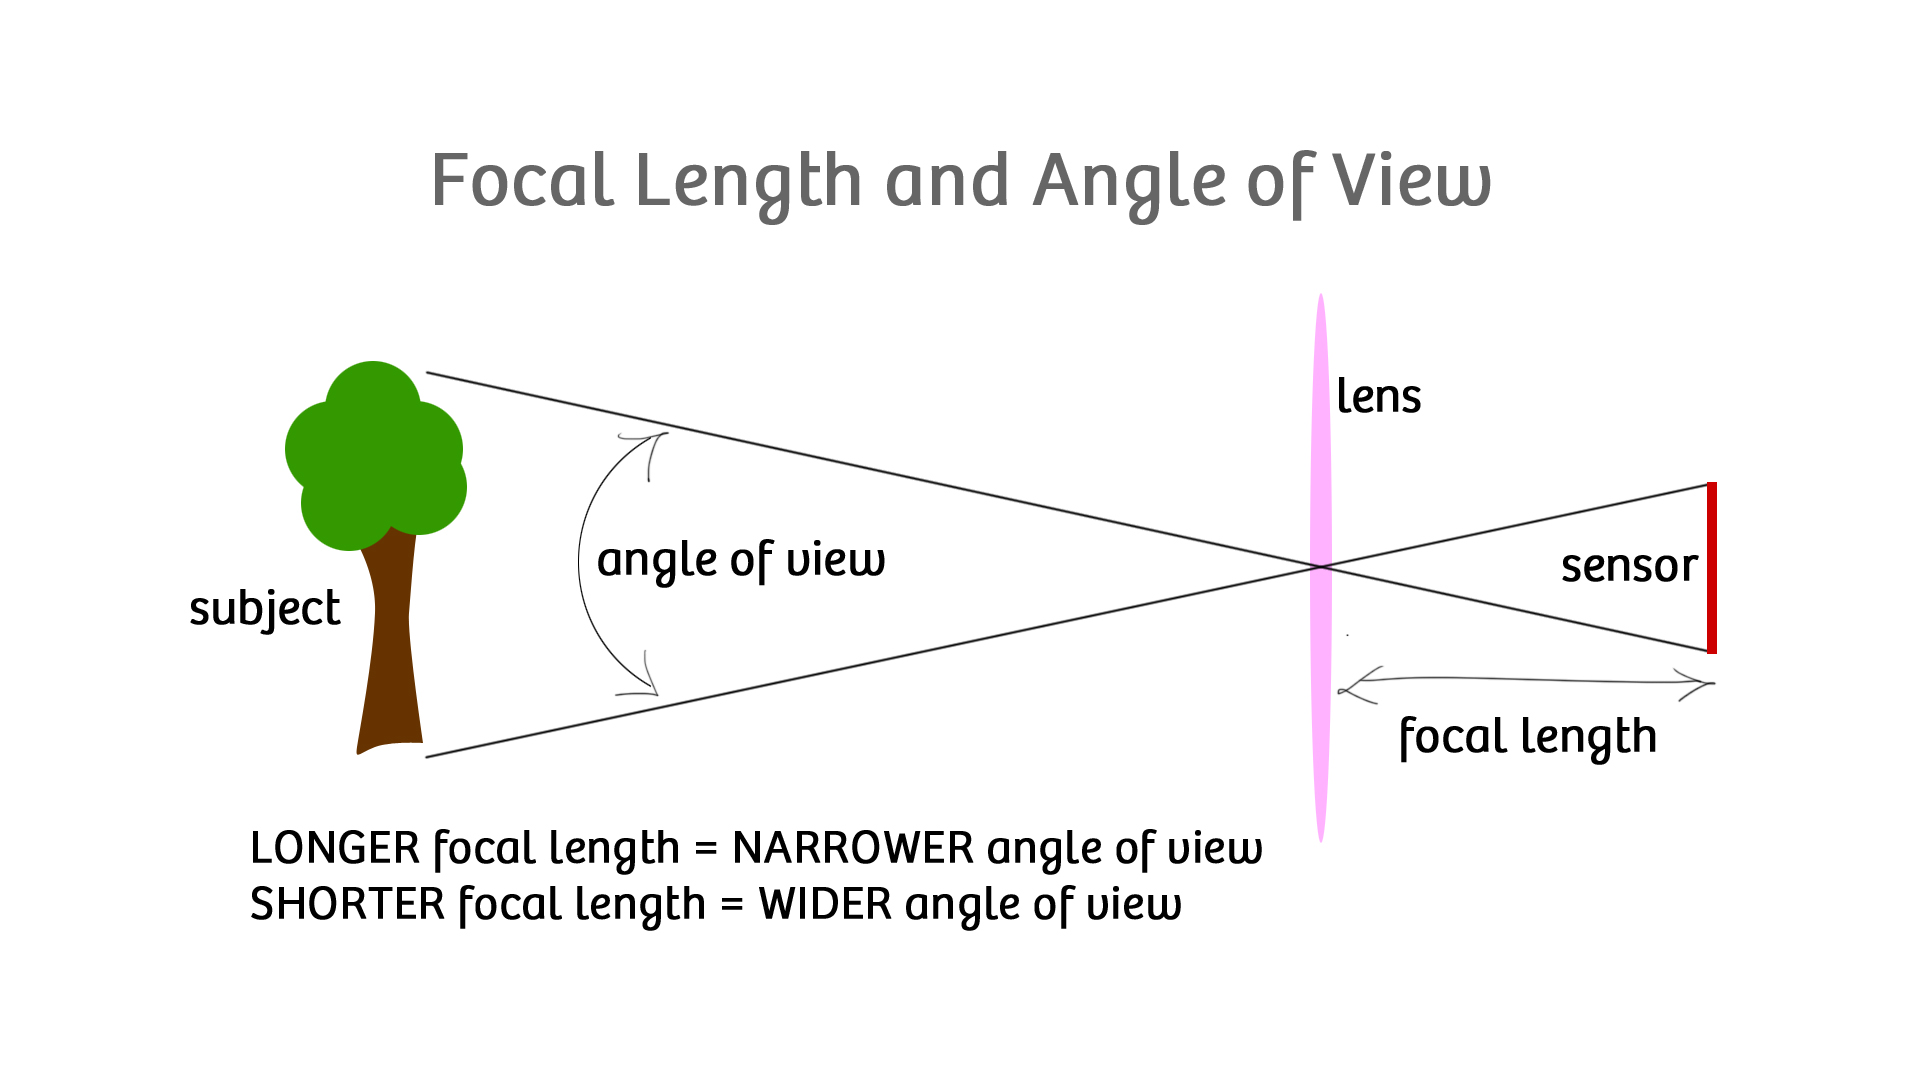
Interestingly, the human eye has a focal length of about 20mm with a field of view around 95˚ (wider than that of the iPhone lens).

Stay Focused
One of the biggest differences between a DSLR and an iPhone is the way the two cameras handle and control focus and depth of field. Obviously, with your DSLR, you have significantly more control. However, now that certain photo apps like Camera+ 6 are building in manual exposure, focus and white balance controls, it’s possible for your iPhone photos to take on the look and feel of your big camera.
Stay focused!
11.0 stay focused


Featured Posts
-
 Camera+ 10 arrives with full depth support, HEIF, accurate viewfinder and smiles!
by Pedro Cuenca
Camera+ 10 arrives with full depth support, HEIF, accurate viewfinder and smiles!
by Pedro Cuenca
-
 A Beginners Guide for Manual Controls in iPhone Photography: ISO
by Jack Hollingsworth
A Beginners Guide for Manual Controls in iPhone Photography: ISO
by Jack Hollingsworth
-
 A Beginners Guide for Manual Controls in iPhone Photography: Shutter Speed
by Jack Hollingsworth
A Beginners Guide for Manual Controls in iPhone Photography: Shutter Speed
by Jack Hollingsworth
-
 How To Shoot Close-Up and Macro Photography With Your iPhone
by Jack Hollingsworth
How To Shoot Close-Up and Macro Photography With Your iPhone
by Jack Hollingsworth